One of my current projects uses XML data, and some of the values in the XML data control the display and content of Visio shapes. Therefore, I looked deeper into how the XML data can be used directly to control parts of the graphics.
Although the external data linking feature in Visio Professional and Visio Plan 2 does have the ability to use XML files, the structure of these XML files is in a particular ADO format, and not suitable for the XML data in this project.
Also, Visio documents can have embedded XML data within it, and there are several methods available to work with the XML, such as Document.SolutionXMLElement. In fact, there are several ShapeSheet cells that can also hold SolutionXML too, as found in the Visio SDK :
The cell must be an A through D cell of the Scratch section or value cell of the User or Custom Properties section.
Custom Properties is the former name of Shape Data, and the SDK contains sample code for putting XML into the Document and a ShapeSheet cell. Unfortunately, the SolutionXML functions only work with the Document, not with a Cell.
Again, there does not seem to be a compelling reason to use SolutionXML with shape cells in my current project because it just adds extra characters, and slightly modifies the XML characters.
Visio cells can store very large amounts of text within them, and in this particular project, I have well structured XML with predictable elements and attributes. Similarly, there are many variations of books.xml on the web, ( small, medium, large ) which I have used for this article to demonstrate what can be done with XML in shapes.
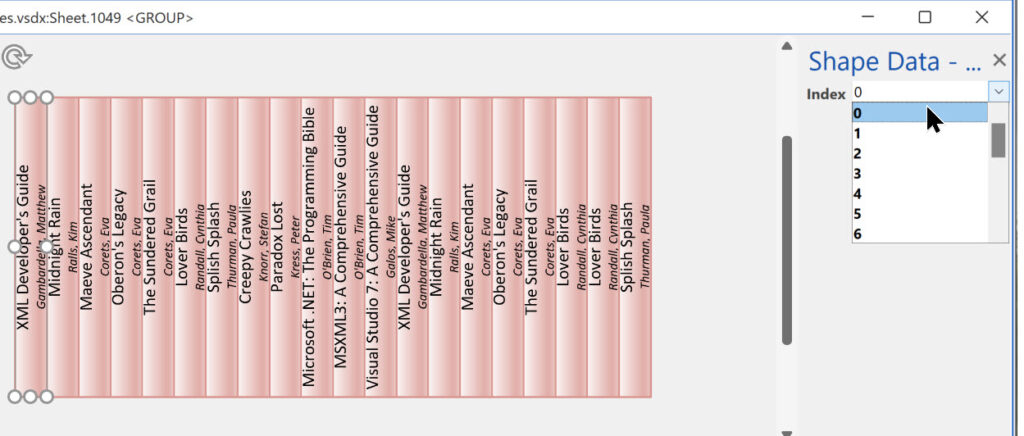
In my case, I have created a Visio shape which has a Shape Data row to store the XML data, and other User-defined Cells to parse the XML data, then more Shape Data rows to just check the contents. I then have a 20 book sub-shapes that can become visible and display the information in the parent XML data automatically:
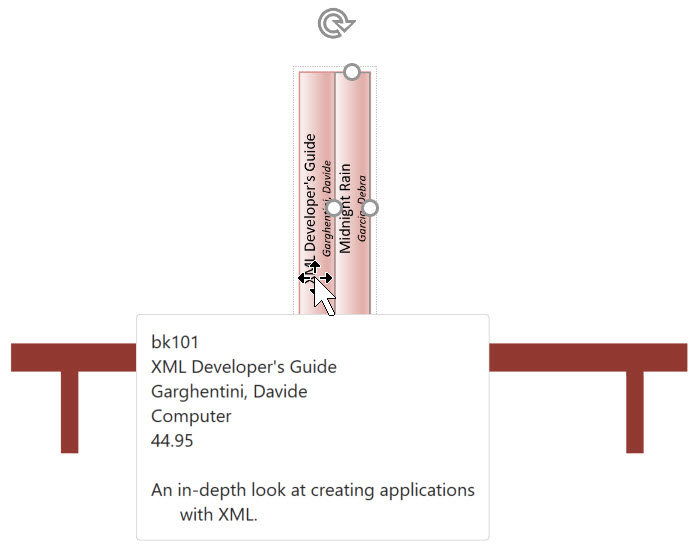
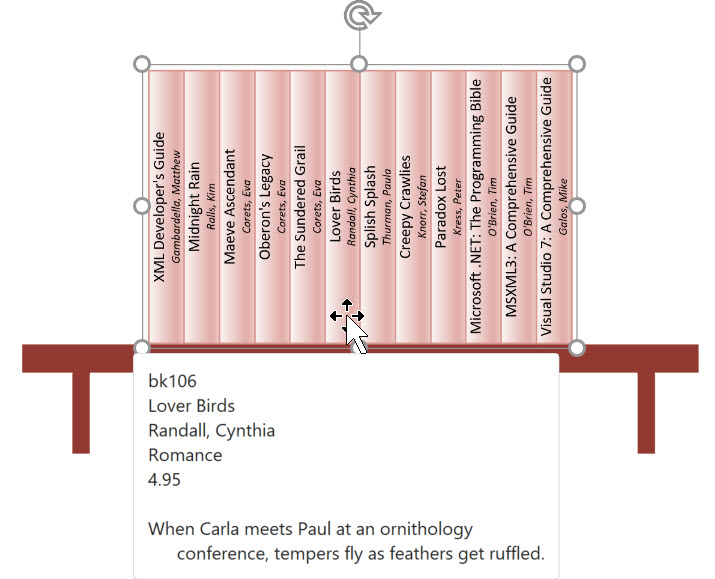
Each of the book shapes automatically gets the book data for its index position on the bookshelf. The ScreenTip displays all of the data, and the label is just the <title> and <author> values.
The XML data is structured like the following:
<?xml version="1.0"?>
<Catalog>
   <Book id="bk101">
      <Author>Garghentini, Davide</Author>
      <Title>XML Developer's Guide</Title>
      <Genre>Computer</Genre>
      <Price>44.95</Price>
      <PublishDate>2000-10-01</PublishDate>
      <Description>An in-depth look at creating applications
      with XML.</Description>
   </Book>
   <Book id="bk102">
      <Author>Garcia, Debra</Author>
      <Title>Midnight Rain</Title>
      <Genre>Fantasy</Genre>
      <Price>5.95</Price>
      <PublishDate>2000-12-16</PublishDate>
      <Description>A former architect battles corporate zombies,
      an evil sorceress, and her own childhood to become queen
      of the world.</Description>
   </Book>
</Catalog>
There are any number of <book> elements, each with an id attribute, and with 6 child elements.
I decided to write a series of ShapeSheet functions that can be called from others cells using the EVALCALL(…) function.
The first, User.fnGetIndex, will return the index of the named element, ARG(“ELEMENT”), in some specified text, ARG(“TXT”), starting from a specified character position, ARG(“FROM”). It will return 0 if ARG(“FROM”) is less than 2 or the ARG(“ELEMENT”) cannot be found in ARG(“TXT”) after the character position ARG(“FROM”).
=IF(ARG("FROM")<2,
0,
IFERROR(
FIND("<"&ARG("ELEMENT"),ARG("TXT"),ARG("FROM"),TRUE)+LEN("<"&ARG("ELEMENT")),
0)
)
The following function, User.fnGetNextIndex, calls the previous function, but uses the value of the previously found named element index, ARG(“ROW”) plus and offset, ARG(“CHARS”), to get the next index of the named element.
=IF(ARG("ROW")=0,
0,
EVALCELL(User.fnGetIndex,
"TXT",ARG("TXT"),
"ELEMENT",ARG("ELEMENT"),
"FROM",
ARG("ROW")+ARG("CHARS")
)
)
I decided to use Shape Data rows to store the XML string, so that it can be simply pasted in, even though the first line is visible in the Shape Data window. So, I used the formula in the Comment cell:
=SETATREF(Prop.XML)This provides a scrollable multi-line dialog to edit or view the text in Prop.XML by using the ScreenTip.
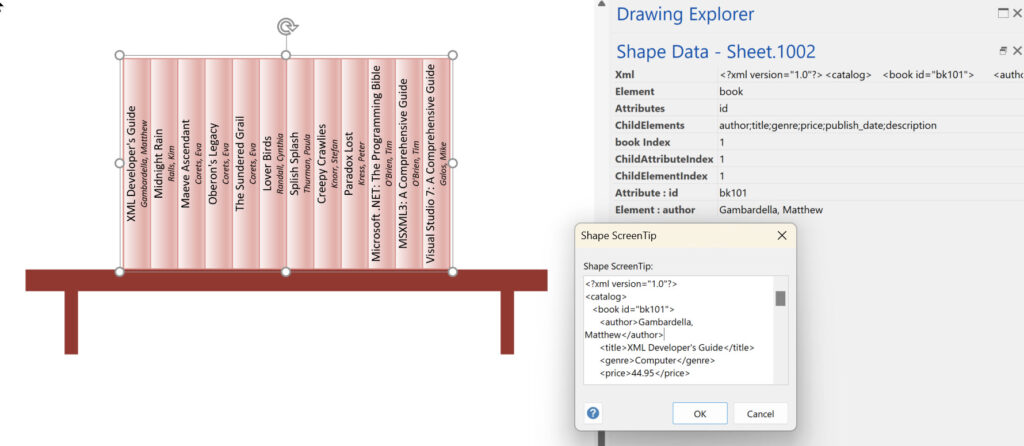
I also added Shape Data rows to enter the target Element name, a semi-colon separated list of Attribute names, and a semi-colon separated list of Child Element names
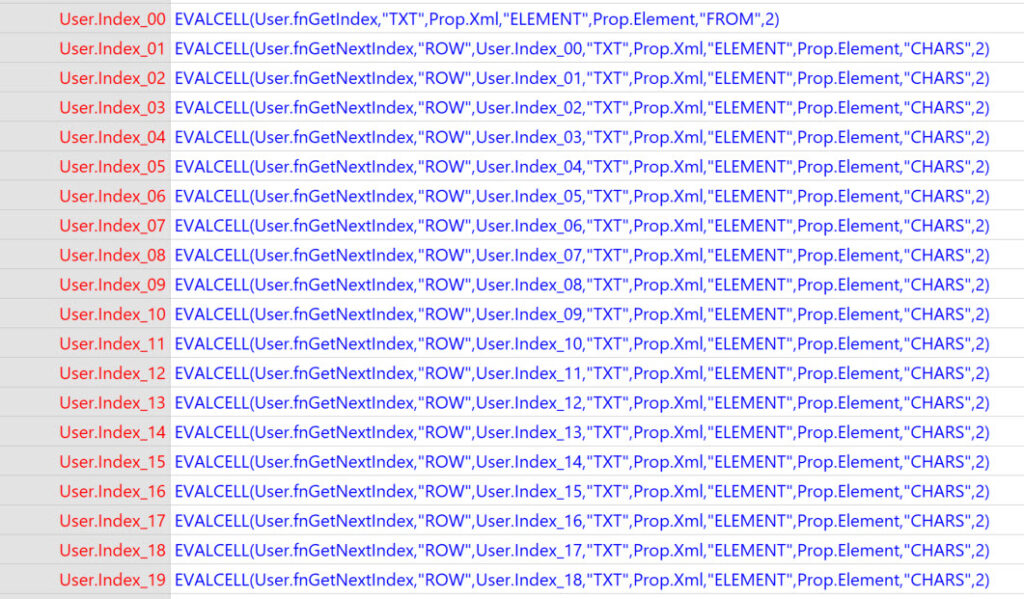
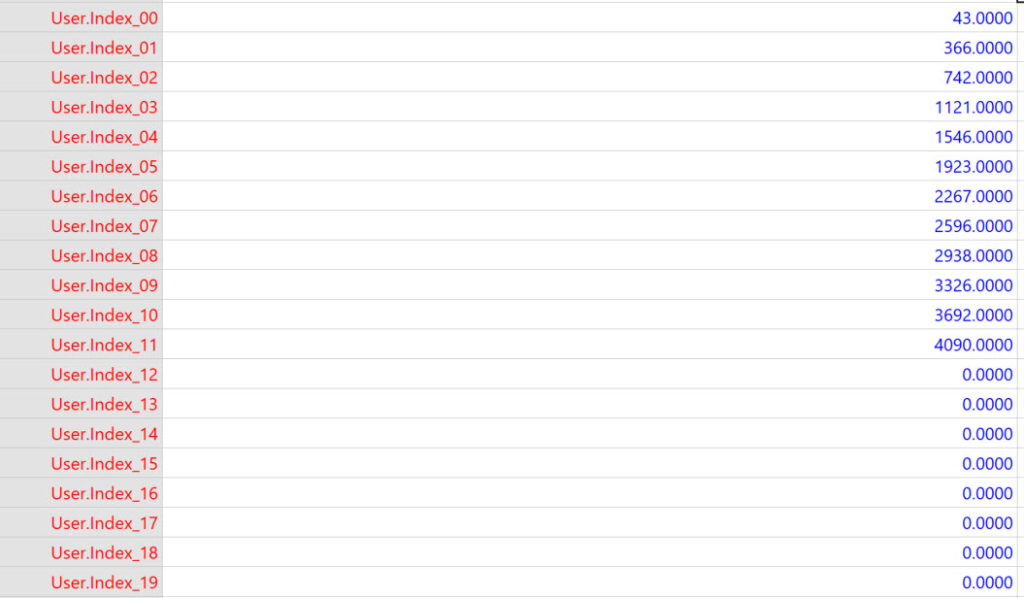
There 20 User-defined Cells that utilise the above functions to get the index position of the Prop.Element value in the XML text.
The first one, User.Index_00, simply finds the first occurrence of the element name in the XML, starting from the second character:
=EVALCELL(User.fnGetIndex,"TXT",Prop.Xml,"ELEMENT",Prop.Element,"FROM",2) The next 19 row, User.Index_01 to User.Index_19, start looking for the Element name from the previous row index, with an offset:
=EVALCELL(User.fnGetNextIndex,"ROW",User.Index_nn,"TXT",Prop.Xml,"ELEMENT",Prop.Element,"CHARS",2)Now that I have the index position of each Element, I can get a count of Elements found (up to my 20 limit) and make a semi-colon separated list of each index for use later.


I added Shape Data rows to allow for manual selection of the index number of the Element, Attribute and ChildElement. I wanted to be able to select these values from a fixed list of available indices for testing, so I needed a function to help with this list concatenation.
Then there are 3 more Shape Data rows to display the text values found using the indices from the previous 3 rows.


Then there are User-defined Cells rows to get a count of the number of Attribute, User.AttributeCount, and ChildElement, User.ChildElementCount, values entered, along with the function, User.fnGetIndexForList, to assist with the list concatenation.


Now that all of the helper functions are defined it just needs functions to return the values of specified Elements and Attributes.
The User.fnGetElement function returns the MID(….) string of the XML text passed in with the ARG(“TXT”) value, with the start position found with the FIND(…) function. It uses the IF(…) and OR(…) functions to avoid trying to use an index number than the count of elements or child elements. The INDEX(…) function is used return the value at the nth position of a list with indices that are zero-based, so 1 is deducted from the passed in value, since I made the fixed-list drop-downs one-based. The LEN(…) function is used to add the length of the element text, with enclosing characters to the start, and remove from the number of characters to return. Finally, the IFERROR(…) function ensures that “” is returned if the element name is not found.
=IF(OR(ARG("EIDX")>ARG("EMAX"),ARG("CIDX")>ARG("CMAX")),
"",
IFERROR(
MID(ARG("TXT"),
FIND("<"&INDEX(ARG("CIDX")-1,ARG("CLST"))&">",
ARG("TXT"),
INDEX(ARG("EIDX")-1,ARG("ELST")),
TRUE)+
LEN("<"&INDEX(ARG("CIDX")-1,ARG("CLST"))&">"),
FIND("</"&INDEX(ARG("CIDX")-1,
ARG("CLST"))&">",
ARG("TXT"),
INDEX(ARG("EIDX")-1,ARG("ELST")),
TRUE)-
FIND("<"&INDEX(ARG("CIDX")-1,ARG("CLST"))&">",
ARG("TXT"),
INDEX(ARG("EIDX")-1,ARG("ELST")),
TRUE)-
LEN("<"&INDEX(ARG("CIDX")-1,ARG("CLST"))&">"))
,"")
)
This can be called like so:
EVALCELL(User.fnGetElement,
"TXT",Prop.Xml,
"EIDX",1,
"EMAX",User.ElementCount,
"ELST",User.Indices,
"CIDX",1,
"CMAX",User.ChildElementCount,
"CLST",Prop.ChildElements)
The above call returns “Gambardella, Matthew” in this example, and if I change the “CIDX” (ChildElement Index) value to 2 it will return “XML Developer’s Guide”.
Similarly, the User.fnGetAttribute will return the value of the requested Attribute index. The formula extracts the value from the XML text :
=IF(OR(ARG("EIDX")>ARG("EMAX"),ARG("AIDX")>ARG("AMAX")),
"",
IFERROR(
MID(ARG("TXT"),
FIND(" "&INDEX(ARG("AIDX")-1,ARG("ALST"))&"=""",
ARG("TXT"),
INDEX(ARG("EIDX")-1,ARG("ELST")),TRUE)+
LEN(" "&INDEX(ARG("AIDX")-1,ARG("ALST"))&"="""),
FIND("""",ARG("TXT"),INDEX(ARG("EIDX")-1,ARG("ELST"))+LEN(" "&INDEX(ARG("AIDX")-1,ARG("ALST"))&"="""),TRUE)-
FIND(" "&INDEX(ARG("AIDX")-1,ARG("ALST"))&"=""",
ARG("TXT"),
INDEX(ARG("EIDX")-1,ARG("ELST")),
TRUE)-
LEN(" "&INDEX(ARG("AIDX")-1,ARG("ALST"))&"=""")),
""))
This can be called with:
=EVALCELL(User.fnGetAttribute,
"TXT",Prop.Xml,
"EIDX",1,
"EMAX",User.ElementCount,
"ELST",User.Indices,
"AIDX",1,
"AMAX",User.AttributeCount,
"ALST",Prop.Attributes)
The above returns “bk101” in this example, which only has one Attribute. So, if I change the “AIDX” (Attribute Index) value to 2 it will return “”, as there isn’t one.
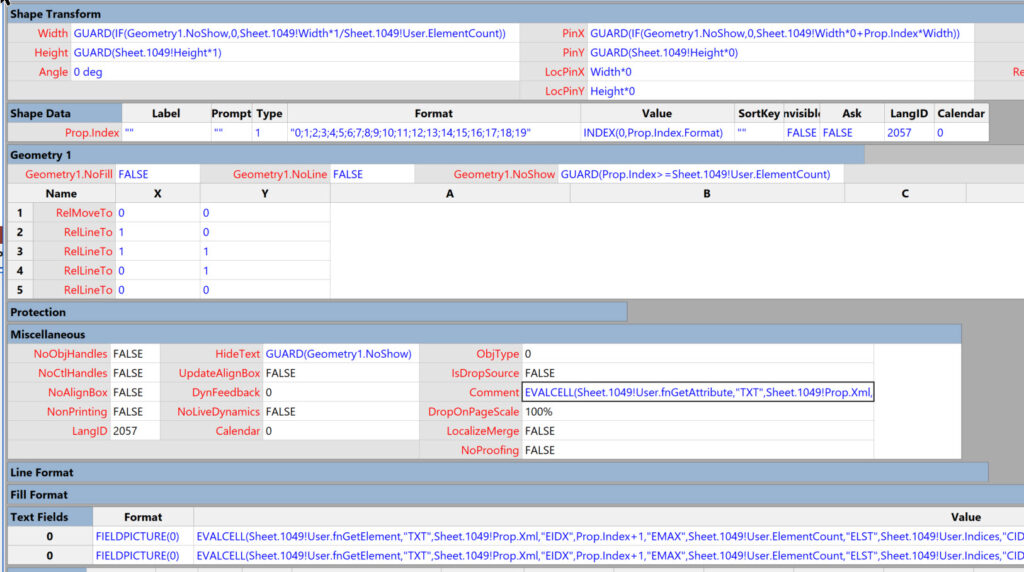
Each of the sub-shapes have a Shape Data row, Prop.Index, with values from 0 to 19, and the Geomtery.NoShow cell has the formula:
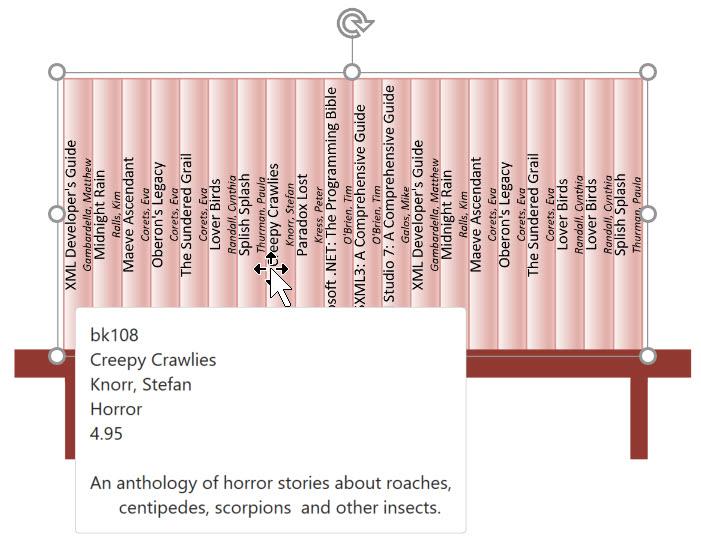
=GUARD(Prop.Index>=Sheet.n!User.ElementCount)Now that I have a shape that automatically configures the sub-shapes from the XML text that is pasted into Prop.XML, I can create a master shape, Books, and drop-down instances with different XML text:
Related articles
Fixing dimensions of 2D shapes
I am often asked what makes Visio unique and makes it stand out from the crowd, especially in today’s online world. Well, I think there are many reasons, but one of them is the ability to create scaled drawings with parametric components of specific dimensions. This was crucial for my adoption of Visio back in…
Merging Linked Data from Similar Tables
I was recently asked how to link data from different tables but with similar column names to Visio shapes. In this case, each table has the same unique identifier, but some of the column names are the same. The problem is that the data linking matches the column name with the label of a Shape…
Smart Radio Buttons and Check Boxes in Visio
A recent project requires an interactive tutorial within Microsoft Visio desktop where a lot of the questions need a single answer using radio buttons, or multiple-choice answers using check boxes. I thought that this would be a great use of the list containers capability because the questions and answers could be part of the container…
Using Button Face Ids in Visio
Microsoft Visio desktop has the ability to display icons from a built-in list of Office icons on Actions and Action Tags (nee Smart Tags). These can be set in the ShapeSheet by using the desired number from several thousand in the ButtonFace cell. Although there is the ability to add better icons using code, the…
Grid Snapping Revisited
I have previously tackled the subject of snapping to grids in Visio desktop (see https://bvisual.net/2018/06/19/really-snapping-to-grids-in-visio/ ) but a recent project required me to improve the example because it did not respond to all cursor arrow keys. The problem was that the previous solution could not understand which arrow key had been clicked, therefore it did…
Optimize Visio Flowcharts: Swimlane Reordering Tips
Microsoft Visio desktop Plan 2 and Professional editions provides the ability to create and synchronize cross-functional flowcharts between the diagram and an Excel table. This is great, and widely used for many types of processes. The Excel table normally has a Function / Swimlane column that contains text that becomes labels on the swimlane containers,…
Leave a Reply