

I was recently laying out a computer room floor plan to scale in Visio, from survey data of the cabinets\racks within it, and it occurred to me that I could work a bit smarter than I first thought. Originally, I was going to just add lots of rectangles, size them, rotate them, and label each them with their name. Then I thought, why not use the Width, Depth and Name columns from the survey data to do most of the work for me? It was so simple to do, and only took a few minutes, so I thought I would share my methodology because it demonstrates how easy it is to work smarter with Visio….


These are the simple steps shown above, written out for your education….
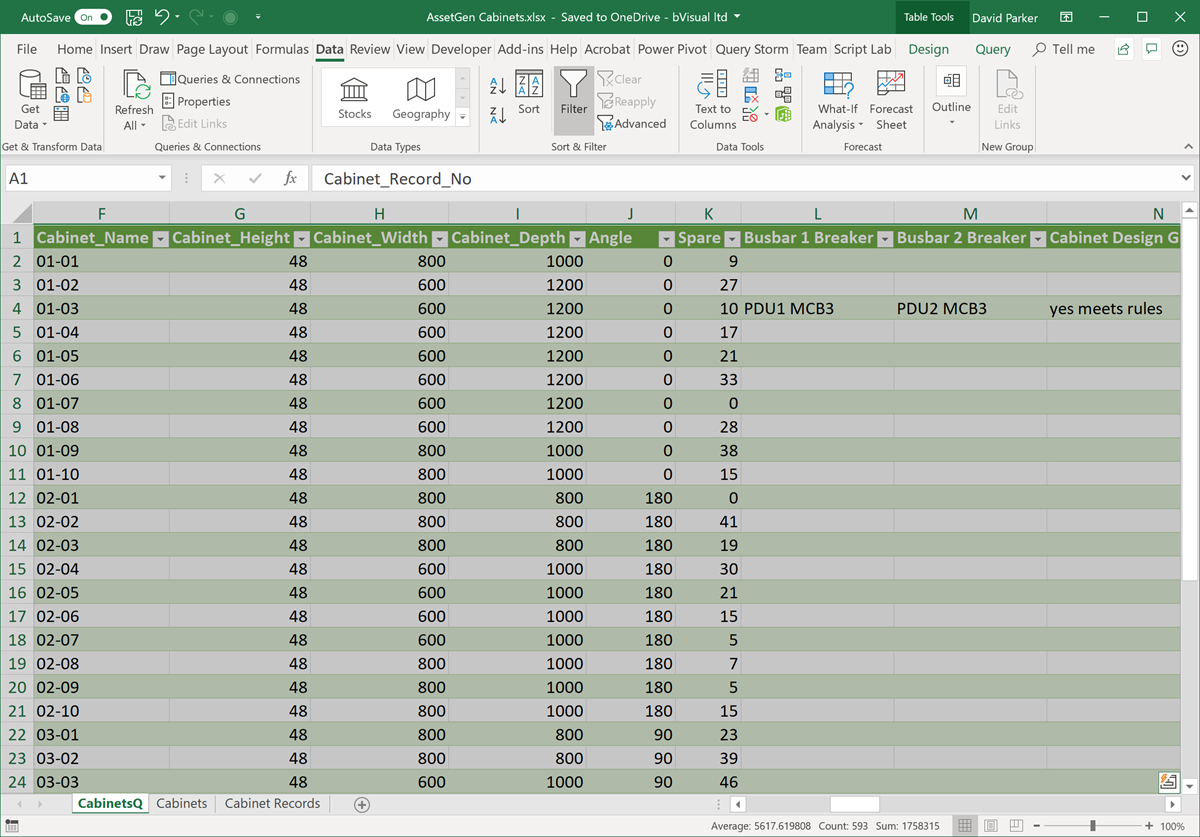
Model the data with Excel PowerQuery if necessary
I often use Excel as the data source for the Data \ Custom Import feature in Visio, even if the orginal data is not in Excel, because Excel has so many more data connection abilities with Data \ Get & Transform Data feature. It is so easy in Excel to then use the (Power)Queries to re-form the data with M Functions ( see Power Query M Reference ). For example, I added an Angle column with the following formula, since I had a Cabinet_Name column that can be used to ascertain the position of the front side of each cabinet:
= Table.AddColumn(#"Replaced Value", "Angle", each if (Text.StartsWith([Cabinet_Name],"01")) then "0" else if (Text.StartsWith([Cabinet_Name],"02") or Text.StartsWith([Cabinet_Name],"SAN") or Text.StartsWith([Cabinet_Name],"I-")) then "180" else "270")
These Excel queries can then be used in Visio (all desktop editions except Standard).
Note that I could have gone further with PowerQuery to formulate the width, height and angle with units, but I decided to do that in Visio ShapeSheet formulas instead.
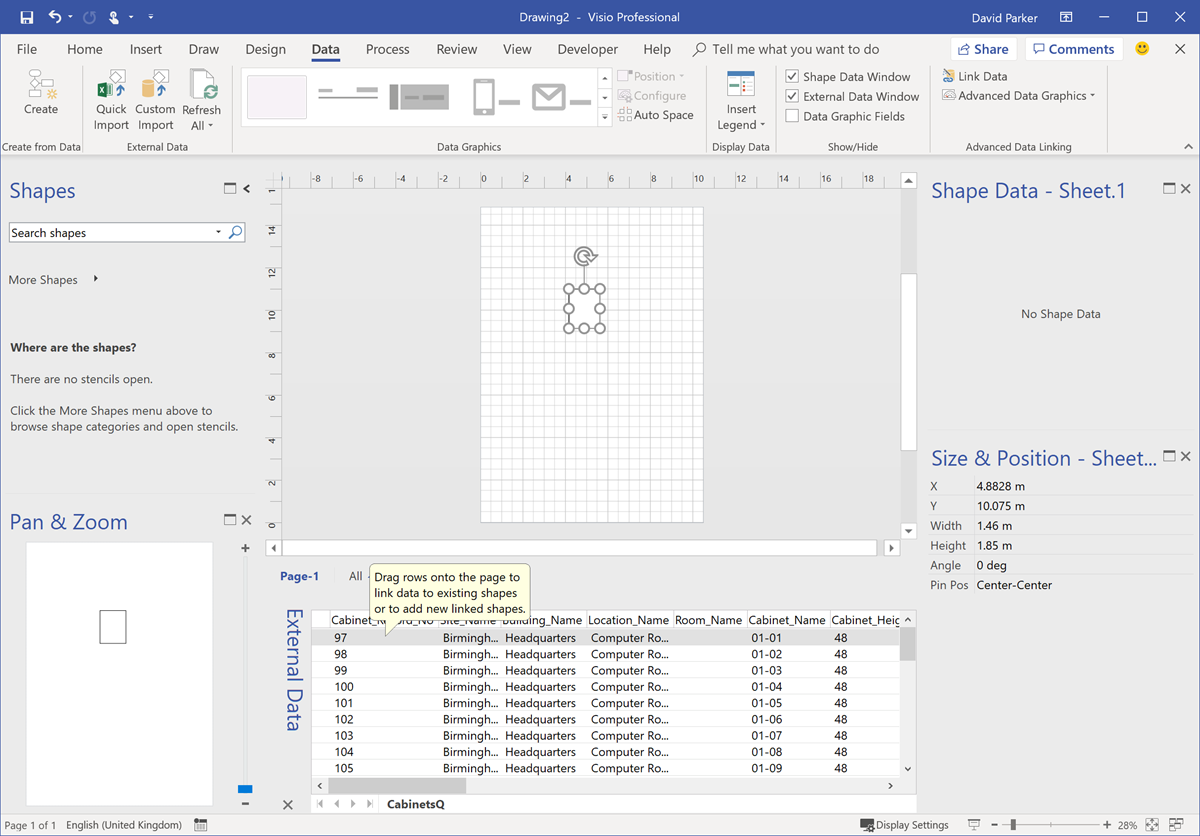
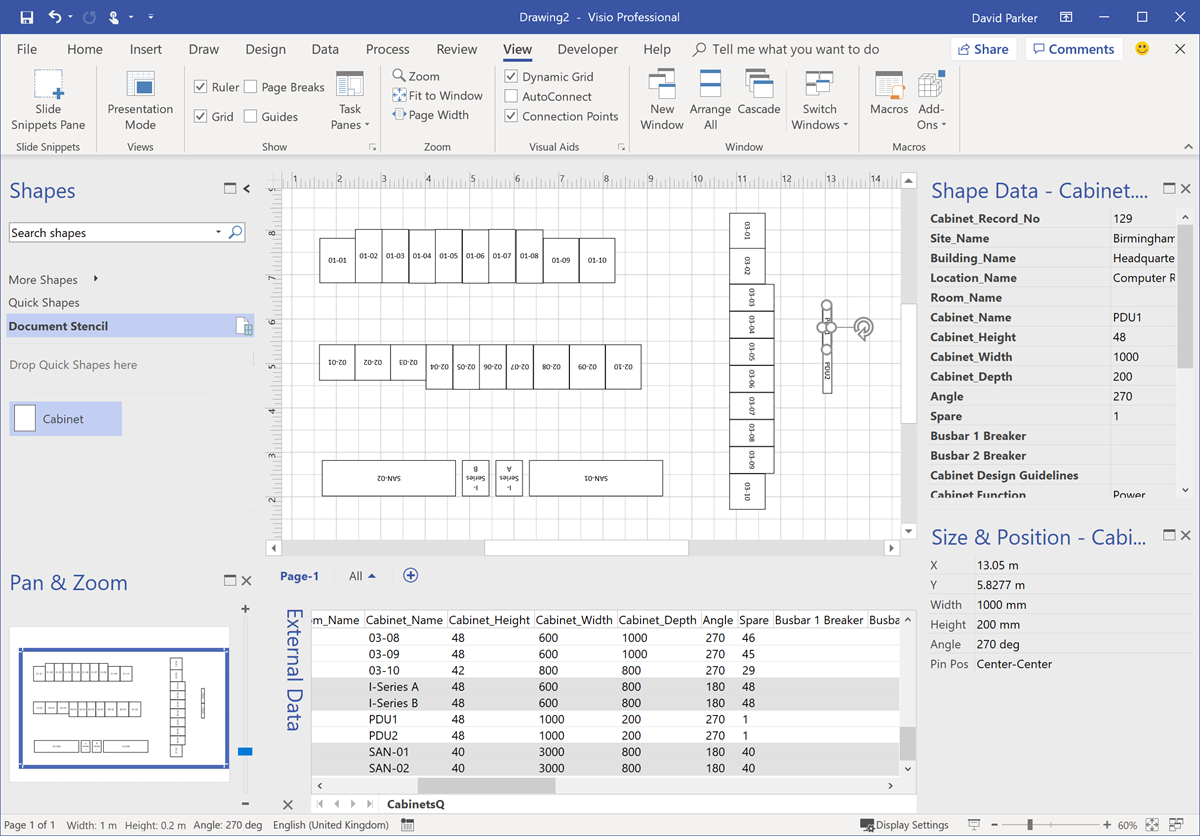
Import the data into Visio and create a simple shape in Visio
I setup my particular page as 1:50 scale with meters units using the Page Setup dialog from the right mouse menu of the page tab. Then I drew a simple shape using Home / Tools / Rectangle. The default angle for shapes drawn like this is zero degrees or radians.
Note that the Size & Position window displays the Width and Height of the rectangle in meters at this point.
Next, I imported the Excel query using the Data \ Custom Import feature, and set the Column_Name as the unique identifier.
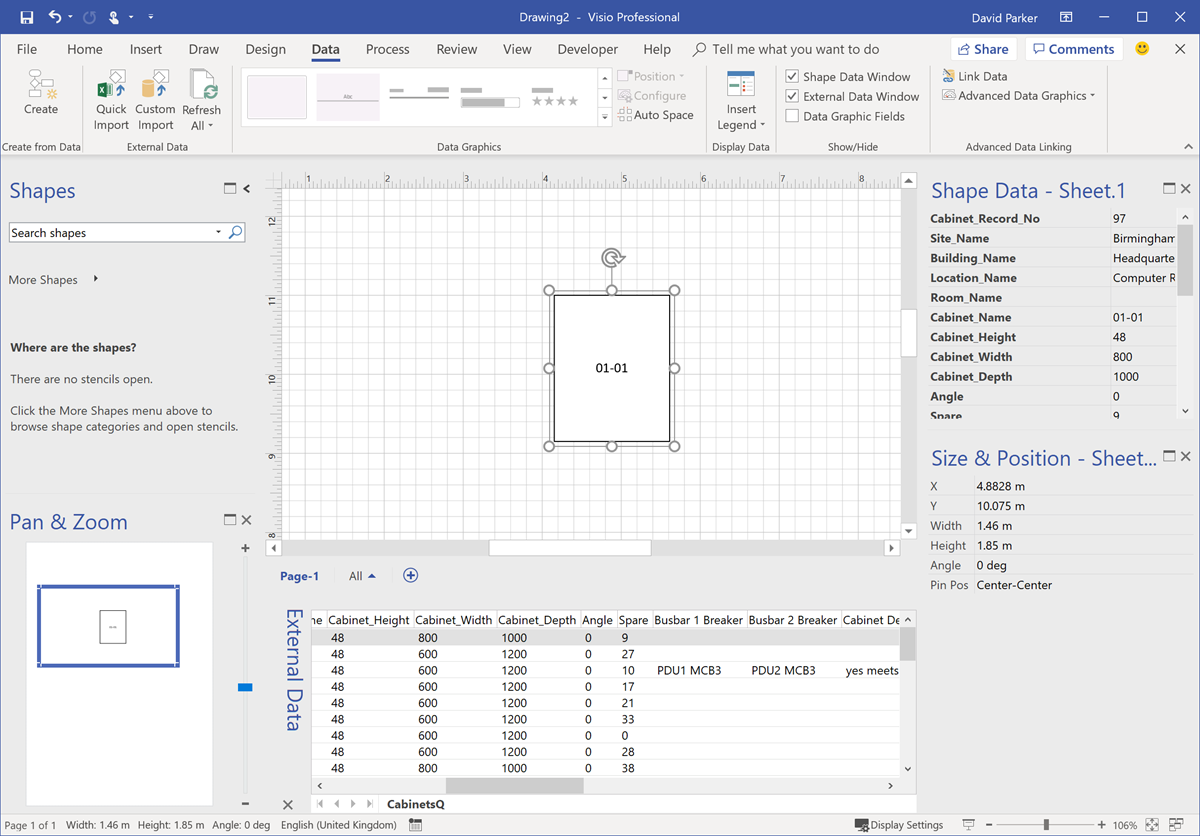
Link a data row to the shape
Then I dragged and dropped one of the rows of data from the External Data window onto the rectangle shape. I did make sure that I chose one with a zero value for the Angle for this.
Note that the shape suddenly gets all of the columns of data from that row as Shape Data.
You can now see that the Cabinet_Height value is 48, but that is not the height required for the shape because it is actually referring to the vertical height being 48 Us, with each U being 1 3/4″ or 44.45 mm, and then their could be a base, plinth and header plate added to this. So, its actual height is greater than 2.136 m ( 48 x 44.45 mm ).
The Cabinet_Width value is shown as 800, but we know that those are actually mm (millimeters), and that needs to be the width of this rectangle.
The Cabinet_Depth value is 1000, again millimeters, and this needs to be the height of the rectangle since we are drawing a floor plan to scale.
Of course, the shape has not changed size or rotated yet … that magic comes next.
You may have accidently added more Data Graphics to your shape than you intended, but no bother since I used Data / Advanced Data Graphics to edit this to display only the Cabinet_Name value as text in the center / middle of the shape. This text will be automatically at the same angle as the shape, so I will be able to tell if the rectangle shape is rotated or not.
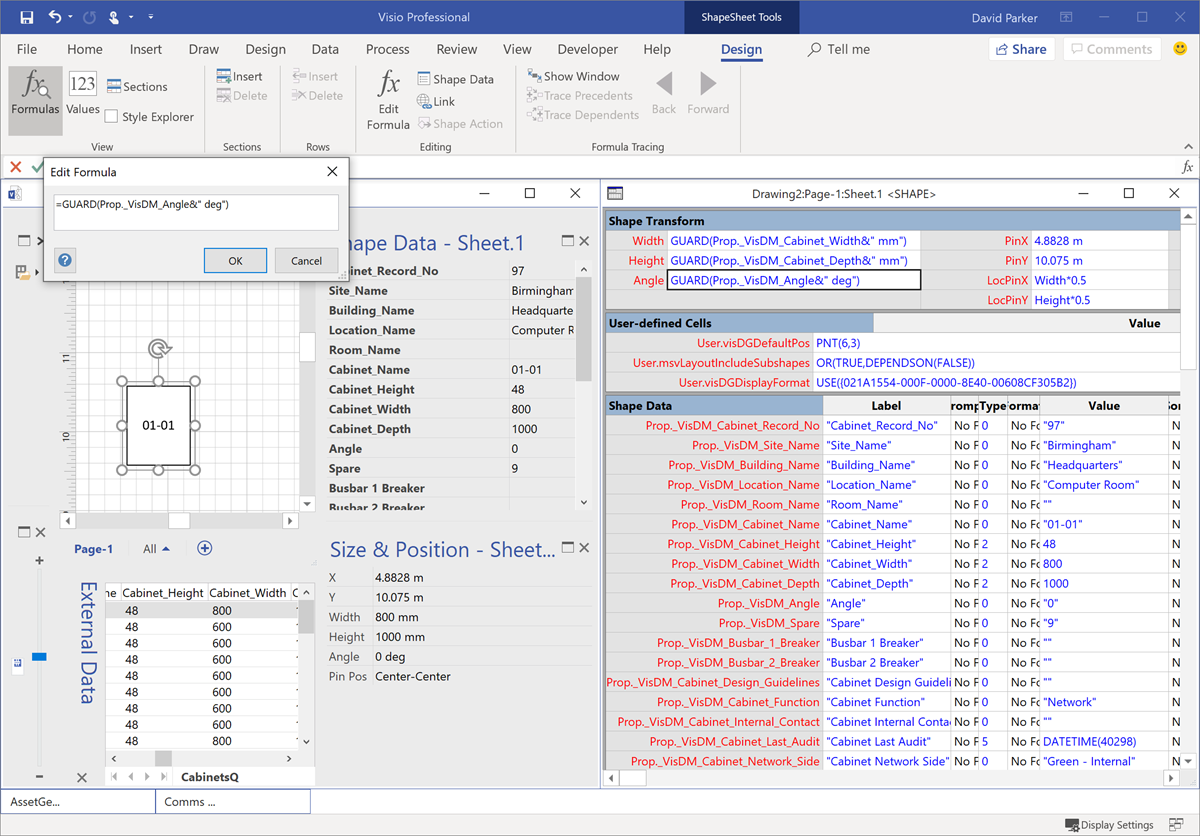
Add ShapeSheet formulas referencing the Shape Data
Many Visio users do not realise that there is a Developer tab in Visio (and other Office applications), that can be easily made visible by ticking it with File / Options / Customize the Ribbon / Main Tab. This is so useful for power users because it reveals a lot more functionality, then main one being the ability to open the ShapeSheet of a selected shape from Developer / Shape Design / Show ShapeSheet or from the right mouse action menu on the shape itself.
Do not be afraid of the ShapeSheet … it is just like entering formulas into cells of an Excel worksheet, but the sheet is split into sections to make it easier to navigate. If you cannot see the sections that I now refer to, then tick them in the dialog that pops up from Design / View / Sections.
Note that the Shape Data section contains many rows, all created by the Link Data action performed earlier, and Visio has automatically named these rows with an _VisDM_ prefix.
Al we need to do now is reference the values in the relevant Shape Data row in the formula of the Width, Height and Angle cells in the Shape Transform section at the top of the ShapeSheet.
Now, Visio stores all measurements as inches to four decimal places behind the scenes, so it is important to include the measurement units if you want something different than inches. Similarly, angles are stored as radians so units should be used to denote degrees. Therefore, enter the formulas as follows:
Width cell:
=GUARD(Prop._VisDM_Cabinet_Width&" mm")
Height cell:
=GUARD(Prop._VisDM_Cabinet_Depth&" mm")
Angle cell:
=GUARD(Prop._VisDM_Angle&" deg")
The GUARD(…) function merely prevents the user from accidently re-sizing the shape or rotating it.
You should find that there is IntelliSense as you type to make it even easier.
Now close the ShapeSheet window and notice that the size, and possibly the angle, of the shape has changed. Also note that the units for the Width and Height are now mm, rather than m.
Create a local master and then create many linked shape instances
Now open the local stencil using More Shapes / Show Document Stencil, and drag the rectangle on to the stencil, and rename it to say, Cabinet.
At this point you do not appear to have any shapes on your page, but all you need to do is ensure that this Cabinet master is selected in the stencil before dragging and dropping one or more rows from the External Data window onto the page.
Hey presto! You now have many different sized and angled Cabinet shapes with a unique data cached into them. All that remains is to position them on the floor plan manually, which is simple if ensure that snap to shape geometry is on, and snap to ruler subdivisions and grid are off.
View the sample Visio drawing : Shape Size and Angle from Data.vsdx
Here is a video of the above