

A recent newsgroup post asked about the ShapeSheet programming of lines in Visio to represent the hands of a clock. Well, it made me think, so here is my solution of a clock in Visio with just the ShapeSheet, and, for good measure, you can set it to refresh every minute!
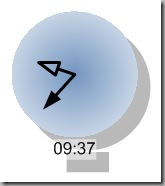

The Clock is a group shape which contains three sub shapes, one each for the hour, minute and second hand.
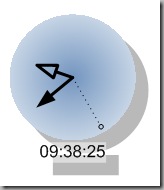

The display of the text is also optional, and the display format of the time is changed according to whether the second hand is displayed.
I have locked the aspect ratio of the clock (the width is always equal to the height) so that I didn’t have to worry about making the hands follow an elliptical path.

I then inserted a User-defined cells section and created eight rows.


The first three rows Hour. Minute and Second, convert the Time property text value into a TIMEVALUE, then extract the HOUR, MINUTE or SECOND part, and finally ensure that the numbers are within the valid range by using the MODULUS function.
The 5th, 6th and 7th rows take the these part time values and convert them into the swept angle from the horizontal position (3 o’clock). Note that Visio measures angles anti-clockwise from the horizontal, but a clock hand sweeps clockwise from the vertical (12 o’clock) position.
The formula in the User.SecondAngle cell is:
=ANG360(90 deg+(360 deg-360 deg*(User.Second/60)))
However, the minute hand sweeps, not only for each minute, but increments slightly between each minute according to the number of seconds. So, the formula for the User.MinuteAngle is:
=ANG360(90 deg+(360 deg-360 deg*(User.Minute/60))-((360 deg/60)*User.Second/60))
Lastly, the hour hand sweeps for each hour, plus an increment for each minute within the hour and each second within the minute. Thus the formula for the User.HourAngle is:
=ANG360(90 deg+(360 deg-360 deg*(User.Hour/12))-((360 deg/12)*User.Minute/60)-((360 deg/360)*User.Second/360))
The User.Synchronize.Format formula is:
=FORMAT(NOW(),”HH:mm:ss”)
This will result in a text value for the time Now(), which evaluates every minute, or whenever the shape is re-evaluated (this could be simply resizing or moving it).
This text value can then be Prop.Time cell, if the user has elected to synchronize with the current time. So, the formula in User.Synchronize is:
=IF(Prop.UseNow,SETF(GetRef(Prop.Time),”=”””&User.Synchronize.Prompt&””””),0)
Finally, User.SecondTrigger formula turns off the display of the Secnd hand by default if the user elects to synchronize, because the Now() function only fires every minute:
=DEPENDSON(Prop.UseNow)+IF(Prop.UseNow,SETF(GetRef(Prop.ShowSecondHand),”FALSE”),0)
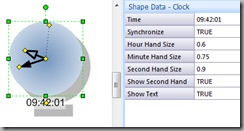
I have also allowed for the user to set the relative length of each hand via the Shape Data, where 1 would be the radius of the clock face and, say, 0.5 would be half of the clock face radius. The user can sub select each of the hands if a different line format is desired, but I have protected the sub-shapes from group formatting.


The visibility of the SecondHandSize row is controlled by the value in the ShowSecondHand row.
I have used Controls (the yellow diamonds) to mark the centre of the clock, position each hand and the optional text block.
![]()

The position of the end each hand has to be relative to the centre of the clock, and uses the ratio of length entered by the user.
For example, the formula in the Controls.Hour.X cell is:
=GUARD(Controls.Centre+(0.5*Prop.HourHandSize*Width)*COS(User.HourAngle))
and in Controls.Hour.Y is:
=GUARD(Controls.Centre+(0.5*Prop.HourHandSize*Height)*SIN(User.HourAngle))
Note that the Tip cell for each row shows the relevant part of the Time value.
The Actions rows simply provide an alternative method of changing the boolean (TRUE/FALSE) SHape Data/Custom Property rows.


The Miscellaneous section of the ShapeSheet provides the opportunity to control the visibility of the text block, and to set the contents of the Screen Tip (Comment).


The formula in the Comment cell is:
=”Time is “&IF(Prop.ShowSecondHand,FORMAT(TIMEVALUE(Prop.Time),”HH:mm:ss”),FORMAT(TIMEVALUE(Prop.Time),”HH:mm”))
Note that I used the same formula in the Text Fields section, after first using Insert / Field .., followed by Shape Data – Time, with the Clock selected. Remember that you cannot insert Text Fields rows in the
![]()

I repositioned, and resized the text block of the clock to be just below the clock, but then I modified the Text Transform section in the ShapeSheet by setting the TextPinX and TextPinY formulae to those of the Controls.Text cells.


So, the final part of the story is how to set the position of the hands!
Well, as I said, these are three sub-shapes, and each are just a simple straight line that starts at the centre of the clock face, and ends at the relevant Control in the parent shape. For example, the 1-D Endpoints of the ShapeSheet of the MinuteHand shape was amended as follows. (Note that the parent/group shape is Sheet.4 in my case – use Format / Special to discover the ID of your shape).


Well, I hope the clock is useful, and I have provided the Visio document here