


A colleague, who is an experienced Visio tutor, asked me how to hook VBA macros to the Fluent UI Ribbon. He figured that it must\should be easy, but he can’t see where it is done. Well, this question has resonance because a plea was made to the Microsoft Visio team at our recent MVP Conference that this often asked for feature should be made easy for the macro developer. Now, I must admit that I have been so busy writing .Net Visio Add-Ins and following the pattern for the Fluent UI in VSTO C# code, that I had not appreciated just how convoluted the calling of VBA from a Ribbon button is. So, I thought I would offer a way of doing this in a simple (I hope!) way.
I will show how this can be done for a Visio drawing or template that contains VBA macros, and how this can be also be used for a Visio stencil that contains the code. I know that some macro developers put their code into drawings, but I would always recommend putting the code into a stencil, if the code is to be used by multiple drawings.
The Visio team’s Insight Blog has some useful background at http://blogs.msdn.com/b/visio/archive/2010/02/24/user-interface-extensibility-in-visio-2010.aspx , but it only has one fleeting mention of VBA macros:
For VBA, you simply provide the contents of a RibbonX XML as a string directly to Visio through the CustomUI property.
So, what does that mean? How do you actually do it?
Well, there is some sample code in the Visio 2016 SDK.

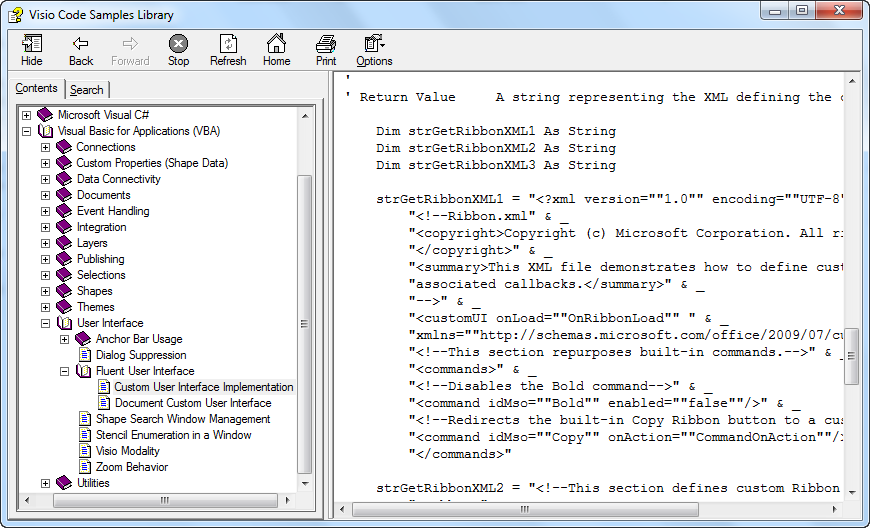
I used this code as a starting point to develop my classes and module that I have included in the download ( see Ribbon Macros.vsd ) for this article. The principle is that the opening of the document will load the custom UI, which will then be removed when the document is closed. I have included the public subs LoadRibbon and UnloadRibbon so that you can set the UI without closing and opening the document repeatedly.

The only change that is required to the code if it is moved into a stencil, id for the ThisDocument parameters to be replaced with Nothing. This will have the effect of enabling any code that is in the stencil whilst it is open. Of course, code in the stencil can be used for any open drawings.
There are four areas in the Fluent UI that can call VBA code:
- The Ribbon
- The Backstage View
- The Context Menus
- The Commands
I have provided an example for each. If you want to read about the principles of Fluent UI design, then you could start here Microsoft Fluent Design , but I am only showing basic buttons in this example. Feel free to expand the range of controls to suit your requirements…
Another useful resource is Office 2016 Help Files : Office Fluent User Interface Control Identifier . This is a series of Excel files that list all of the built-in control Ids for all of the Microsoft Office documents, and one of them, VisioControls.xlsx, lists those for Visio.
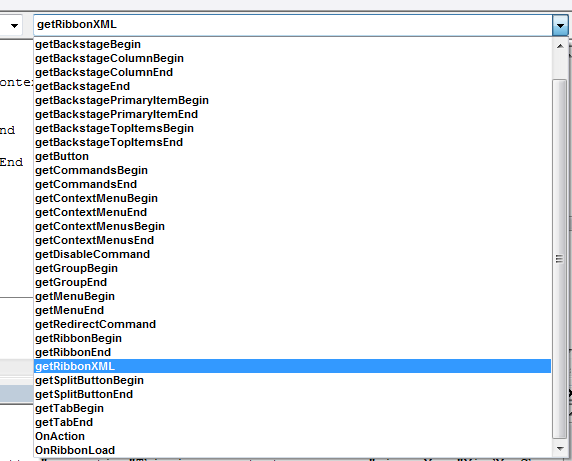
I decided to create some methods in the CustomUI module to return XML snippets for various parts of XML string required to build the Ribbon xml:

I included carriage return line feeds (vbCrlf) and tabs (vbTab) in the XML to make it easier to understand.
All of these XML snippets are called from the getRibbonXML method, so you only need to edit this function to modify the UI. In fact, I have included four parameters in the header of getRibbonXML to make it easier to switch on/off each of the four Fluent UI elements:
Private Function getRibbonXML(ByVal includeCommands As Boolean, _ByVal includeRibbonTab As Boolean, ByVal includeBackstage As Boolean, _ByVal includeContextMenus As Boolean) As String
This function is called from IRibbonExtensibility_GetCustomUI method in the Ribbon class.
The Ribbon
You can add groups to existing tabs in the ribbon, but you will most probably want to add your own tab with groups and buttons on it. In my example, I have created a new tab, labeled Custom Ribbon Tab, with a single group, labeled Custom Group, containing a large button, Macro 1; two small buttons, Macro 2 and Macro 3; and a split button, Macro 4.

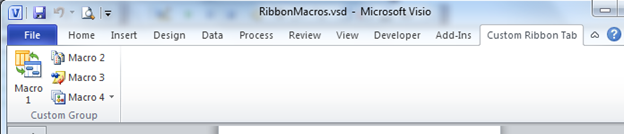
In fact, the split button contains two menu items, Macro 4 and Macro 5.

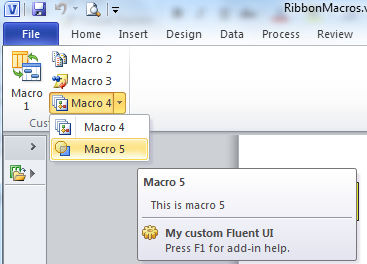
All of the buttons have an icon, see the Office 2010 Add-In : Icons Gallery at http://www.microsoft.com/downloads/en/details.aspx?displaylang=en&FamilyID=2d3a18a2-2e75-4e43-8579-d543c19d0eed , and each has a supertip (a longer description) that is displayed on mouse over. Note that the FriendlyName, My custom Fluent UI, is entered in the CustomUIStart method in the CustomUI module.
The code that creates this button can be found in getRibbon method of the Ribbon class:
        'Open the Ribbon element
        strGetRibbonXML2 = getRibbonBegin
        'Open the Tab element
        strGetRibbonXML2 = strGetRibbonXML2 & getTabBegin(False, "tab1", "Custom Ribbon Tab")
        'Open the Group element
        strGetRibbonXML2 = strGetRibbonXML2 & getGroupBegin(False, "group1", "Custom Group")
        'Add custom buttons as required
        strGetRibbonXML2 = strGetRibbonXML2 & getButton( _
            "customMacro1", "Macro 1", "This is macro 1", "GroupSynchronizeWithSite", True)
        strGetRibbonXML2 = strGetRibbonXML2 & getButton( _
            "customMacro2", "Macro 2", "This is macro 2", "GroupViewsInfoPath", False)
        strGetRibbonXML2 = strGetRibbonXML2 & getButton( _
            "customMacro3", "Macro 3", "This is macro 3", "PostReply", False)
        'Open the split button element
        strGetRibbonXML2 = strGetRibbonXML2 & getSplitButtonBegin("customSplit1")
        'Open the menu element
        strGetRibbonXML2 = strGetRibbonXML2 & getMenuBegin("customMenu1")
        'Add custom buttons as required
        strGetRibbonXML2 = strGetRibbonXML2 & getButton( _
            "customMacro4", "Macro 4", "This is macro 4", "VisioDiagramGallery", False)
        strGetRibbonXML2 = strGetRibbonXML2 & getButton( _
            "customMacro5", "Macro 5", "This is macro 5", "VisioTransparency", False)
        'Close the menu element
        strGetRibbonXML2 = strGetRibbonXML2 & getMenuEnd
        'Close the split button element
        strGetRibbonXML2 = strGetRibbonXML2 & getSplitButtonEnd
        'Close the Group element
        strGetRibbonXML2 = strGetRibbonXML2 & getGroupEnd
        'Close the Tab element
        strGetRibbonXML2 = strGetRibbonXML2 & getTabEnd
        'Close the Ribbon element
        strGetRibbonXML2 = strGetRibbonXML2 & getRibbonEnd
This produces the XML snippet:
<ribbon><tabs><tab id="tab1" label="Custom Ribbon Tab"><group id="group1" label="Custom Group"><button id="customMacro1" label="Macro 1" supertip="This is macro 1" size="large" imageMso="GroupSynchronizeWithSite" onAction="OnAction"/><button id="customMacro2" label="Macro 2" supertip="This is macro 2" imageMso="GroupViewsInfoPath" onAction="OnAction"/><button id="customMacro3" label="Macro 3" supertip="This is macro 3" imageMso="PostReply" onAction="OnAction"/><splitButton id="customSplit1"><menu id="customMenu1"><button id="customMacro4" label="Macro 4" supertip="This is macro 4" imageMso="VisioDiagramGallery" onAction="OnAction"/><button id="customMacro5" label="Macro 5" supertip="This is macro 5" imageMso="VisioTransparency" onAction="OnAction"/></menu></splitButton></group></tab></tabs></ribbon>
The Backstage View
I have given an example for two columns in the Backstage View, in a new tab labeled Custom Tab. I have included a large button, labeled BS Macro 1 and; and two normal buttons, labeled BS Macro 2 and BS Macro 3.


The code that creates this button can be found in getRibbon method of the Ribbon class:
'Open the backstage elementstrGetRibbonXML3 = getBackstageBegin'Open the tab elementstrGetRibbonXML3 = strGetRibbonXML3 & getTabBegin(False, "tab2", "Custom Tab")'Open the column elementstrGetRibbonXML3 = strGetRibbonXML3 & getBackstageColumnBegin(One)strGetRibbonXML3 = strGetRibbonXML3 & vbTab & getGroupBegin(False, "group2", "Custom Group 2")strGetRibbonXML3 = strGetRibbonXML3 & getBackstagePrimaryItemBegin'Add custom buttons as requiredstrGetRibbonXML3 = strGetRibbonXML3 & vbTab & vbTab & getButton( _"customBMacro1", "BS Macro 1", "This is bs macro 1", "GroupSynchronizeWithSite", False)'Close the primaryitem elementstrGetRibbonXML3 = strGetRibbonXML3 & getBackstagePrimaryItemEnd'Close the group elementstrGetRibbonXML3 = strGetRibbonXML3 & vbTab & getGroupEnd'Close the column elementstrGetRibbonXML3 = strGetRibbonXML3 & getBackstageColumnEnd(One)'Open the column elementstrGetRibbonXML3 = strGetRibbonXML3 & getBackstageColumnBegin(Two)'Open the group elementstrGetRibbonXML3 = strGetRibbonXML3 & vbTab & getGroupBegin(False, "group3", "Custom Group 3")'Open the topitems elementstrGetRibbonXML3 = strGetRibbonXML3 & getBackstageTopItemsBegin'Add custom buttons as requiredstrGetRibbonXML3 = strGetRibbonXML3 & vbTab & vbTab & getButton( "customBMacro2", "BS Macro 2", "This is bsmacro 2", "GroupViewsInfoPath", False) strGetRibbonXML3 = strGetRibbonXML3 & vbTab & vbTab & getButton( "customBMacro3", "BS Macro 3", "This is bsmacro 3", "PostReply", False)'Close the topitems elementstrGetRibbonXML3 = strGetRibbonXML3 & getBackstageTopItemsEnd'Close the group elementstrGetRibbonXML3 = strGetRibbonXML3 & vbTab & getGroupEnd'Close the column elementstrGetRibbonXML3 = strGetRibbonXML3 & getBackstageColumnEnd(Two)'Close the tab elementstrGetRibbonXML3 = strGetRibbonXML3 & getTabEnd'Close the backstage elementstrGetRibbonXML3 = strGetRibbonXML3 & getBackstageEnd
This produces the XML snippet:
<backstage><tab id="tab2" label="Custom Tab"><firstColumn><group id="group2" label="Custom Group 2"><primaryItem><button id="customBMacro1" label="BS Macro 1" supertip="This is bs macro 1" imageMso="GroupSynchronizeWithSite" onAction="OnAction"/></primaryItem></group></firstColumn><secondColumn><group id="group3" label="Custom Group 3"><topItems><button id="customBMacro2" label="BS Macro 2" supertip="This is bsmacro 2" imageMso="GroupViewsInfoPath" onAction="OnAction"/><button id="customBMacro3" label="BS Macro 3" supertip="This is bsmacro 3" imageMso="PostReply" onAction="OnAction"/></topItems></group></secondColumn></tab></backstage>
The Context Menus
The second tab, named contextmenus, of the VisioControls.xlsx Excel workbook lists the possible contexts for the menus. In my example, I have used ContextMenuShape so that the button, labeled My Button, will be available on the Action Menu whenever a 2D shape is selected.

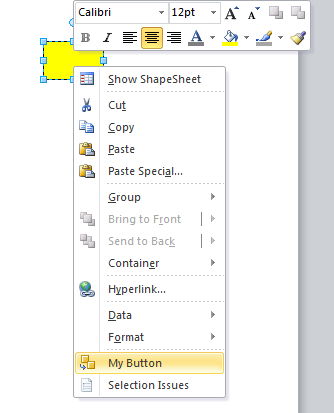
The code that creates this button can be found in getRibbon method of the Ribbon class:
'Open the context menus group elementstrGetRibbonXML4 = getContextMenusBegin 'Open the context menu element'See the contextmenus worksheet in C:\Office 2010 Developer Resources\Documents\Office2010ControlIDs\VisioControls.xlsxstrGetRibbonXML4 = strGetRibbonXML4 & getContextMenuBegin("ContextMenuShape")'Include any menu buttons requiredstrGetRibbonXML4 = strGetRibbonXML4 & getButton( _ "customContextMacro1", "My Button", "This is my context menu macro", _ "MindMapChangeTopic", False) 'Close the context menu elementstrGetRibbonXML4 = strGetRibbonXML4 & getContextMenuEnd'Close the context menus group elementstrGetRibbonXML4 = strGetRibbonXML4 & getContextMenusEnd
This produces the XML snippet:
<contextMenus><contextMenu idMso="ContextMenuShape"><button id="customContextMacro1" label="My Button" supertip="This is my context menu macro" imageMso="MindMapChangeTopic" onAction="OnAction"/></contextMenu></contextMenus>
The Commands
You can disable or re-purpose built-in commands too. For example, I have provided an example of disabling the Bold button and re-purposing the Copy command …

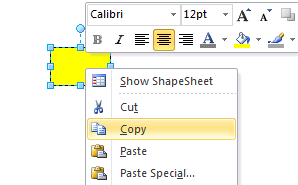
… so that it runs some custom code:

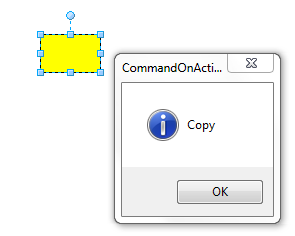
The code that creates this button can be found in getRibbon method of the Ribbon class:
'Open the Commands elementstrGetRibbonXML1 = getCommandsBegin'Add Command actions as required'You can disable commandsstrGetRibbonXML1 = strGetRibbonXML1 & getDisableCommand("Bold")'You can re-purpose commandsstrGetRibbonXML1 = strGetRibbonXML1 & getRedirectCommand("Copy")'Close the Commands elementstrGetRibbonXML1 = strGetRibbonXML1 & getCommandsEnd
This produces the XML snippet:
<commands><command idMso="Bold" enabled="false"/><command idMso="Copy" onAction="CommandOnAction"/></commands>
Calling Your VBA Code
You may have noticed that the onAction attributes in all of the above XML have the value OnAction or CommandOnAction. I think that centralising the calls for the buttons and the commands like this, makes it easier to follow. I show the OnAction method below, and the CommandOnAction is very similar. So, all you have to do is ensure that you have a Case option for the ID of any control (button) that you have in the Ribbon XML.
Public Sub OnAction(ByVal control As IRibbonControl)' OnAction'' Abstract - This method is a callback specified in the custom UI XML file.' It is called by Visio when the associated button defined in the XML is pressed.'' Parameters' control The Ribbon UI control that was activated' To execute a VBA macro, use the Document.ExecuteLine method.' For example: Document.ExecuteLine("ThisDocument.HelloWorld");Select Case control.IDCase "customMacro1"'Call to your codeThisDocument.ExecuteLine "HelloWorld" Exit SubCase "customMacro2"'Call to your codeCase "customMacro3"'Call to your codeCase "customMacro4"'Call to your codeCase "customMacro5"'Call to your codeCase "customContextMacro1"'Call to your codeEnd SelectMsgBox control.ID, vbInformation, "OnAction"End Sub
Conclusion
I hope that this provides an easy (well, not quite as easy as I would have liked) way for you to hook your VBA macros into the ribbon.
You have four different areas in the Fluent UI that you can utilise, so, have fun.